Rolling Featherboard


When cutting raised panels on a router table, my featherboard attachment does me little good.

With the panel up on edge, my featherboard simply doesn't provide enough support to help steady the workpiece while I'm making the cut. To solve this problem, I came up with a device that works like a featherboard, yet offers much more support in keeping upright panels steady.

My rolling featherboard consists of an L-shaped fence (made with MDF) with a pair of appliance casters attached to one side. The rollers allow the workpiece to glide smoothly along the table while the spring action behind the rollers keeps it snug to the fence. 

First build the fence section. Attach the castors to a length of MDF that matches the width of your router table. To make sure the castors will move in and out of the fence (as the spring expands and contracts) be sure to drill holes for the castor studs slightly larger than the stud diameter. Also, studs on casters can be rather short, so you might need to counterbore the holes in your fence stock (see detail a.) 


Next attach a base to the fence with woodscrews.

Flush Trim Jig


Recently I was building a plywood bookcase with several shelves. To conceal the rough plywood, I glued hardwood strips to the front of each shelf. But when I tried to trim the strips using my router, the edge of the shelf was too narrow for my router to ride on. So I came up with this quick jig for trimming these kind of edges.

The jig provides a wide, flat support surface that I can attach to any board for trimming narrow edges. Simply clamp the jig to the side of your work piece, align it flush with the edge of your shelf, and start trimming (see photo).

To make the jig, join two pieces of 3/4" plywood with glue and screws to form an " L" shaped object, see drawing below. Then attach a small support bracket to each end.

After you assemble the jig, be sure to cut a shallow notch in the front edge to create clearance for waste. This notch can be cut on a table saw. (Just make sure you don't cut through the screws.)

Zero-Clearance Top


Most table saw inserts have wide throat openings around the saw blade. This makes it all too easy for narrow cutoffs to fall in the opening and possibly bind against the blade. Also, since the throat opening isn't supporting the workpiece, you'll often end up with chipout along the bottom face of your board.

To solve these problems, I made a zero-clearance insert from ¼" hardboard. But as you can see in the drawing, the one I made doesn't replace my standard table saw insert, it's simply a large piece of hardboard that I lay over my table just before I'm ready to make a cut.

Here's how it works.

1. Set your rip fence for the desired width of the cut.
2. Lower your saw blade below the surface.
3. Place the hardboard on your table, flush with the fence. Use carpet tape to hold it in place.
4. Turn on the saw and slowly raise the blade. 
5. Position your workpiece and make the cut.

To make another cut at a different width, simply re-adjust the fence following the steps listed above. The large-size board will provide you plenty of room for making a variety of cuts before it needs to be replaced.

Table Saw Taper Jig


Recently, I was building a blanket chest featured in Workbenchmagazine. When it came time to make the thick, tapered legs, I needed a way to make a long, angled cut quickly and accurately. But I also wanted to make sure the taper on both legs ended up identical. So, I made a simple taper jig. The jig makes it easy to position the leg at the correct angle and hold it in place during the cut (see photo).

The jig is nothing more than a plywood base with two support blocks. The base acts like a "sled" that carries the leg through the saw blade. A couple of hold-downs attached to the long support block prevent the leg from shifting.

To build the jig, start by ripping a piece of plywood for the base. The ripped edge will serve as a reference to indicate the path of the saw blade. This same reference edge can be used to align the leg on the base and help locate the support blocks.

To position the support blocks, lay out the width of the leg at the top end, then align this mark with the reference edge on the base of the jig. Next, position the bottom outside corner of the leg flush with the reference edge and trace the outline of the leg onto the base (Fig.1).


Then screw down the support blocks along the layout lines and add the hold-downs (Fig.2).


Now to use the jig, simply push it through the saw blade along the reference edge to cut a taper on each leg.

Small Piece Miter Gauge


I make a lot of small picture frames for gifts. But there's a couple challenges: mitering the small pieces accurately and holding them safely. So I've made a jig designed to help with this. It's nothing more than a shallow box attached to a miter gauge runner.

The runner rides in the miter gauge slots for accuracy, as you can see in the photo. And the workpiece can be clamped to either side of the jig so your hands are always out of the way.

The Jig: To make the jig, cut four pieces of stock for the sides. Rabbet joints at the ends of two of the pieces help align them during glue-up, as shown in the main drawing. (Note: Size the pieces for the box so it clears the blade once it's attached to the runner, as illustrated in the detail at right).

Add Bottom: To strengthen the sides of the box, I glued a piece of ¼" hardboard to the bottom. Finally, glue and screw the box to a wood runner. 


Note: To cut accurate miters with this jig, it's critical to make sure the box is square and sits at a 45° angle to the blade. (I used a plastic triangle to set the position of the box.)


Shop Tip: The workpiece may shift when making the cut even when it's clamped. To prevent this, you may want to attach self-adhesive sandpaper to the sides of the box.


Small Parts Sled


Using a table saw to trim a number of small parts to identical size can be tricky — especially if the cut is angled. But this small parts sled makes it easy and safe.

The sled consists of two parts: a base that carries the workpiece through the saw blade and a pair of fences that position the workpiece on the sled.

Base: The base is a scrap of ¼" plywood (or hardboard) that’s ripped wide enough to accommodate the workpieces, as you can see in Figure 1. (I cut mine 6" wide.) This creates a reference edge that’s used to position the fence.

Note: You can make the sled whatever width is required for the workpieces you are trimming. Just don't move the rip fence once you've cut the reference edge.


Fence: The fence is made up of two scrap pieces. To position these pieces, lay out the line you want to trim to on one of the workpieces. Then, align the mark with the reference edge on the plywood. Finally, butt the fence pieces against the edges of the workpiece and glue them to the base, as shown in Figure 2.

Note: Hot melt glue works great for this.


Trim Workpieces: Now you're ready to trim the workpieces. Just slip one in place against the fences and then run the sled along the rip fence.

Note: In my case, the workpieces were mirror images. So when I trimmed them, I could stack the two mating pieces together, as you can see in Figure 2.

Rip Fence Setup Gauge


When trying to make very accurate cuts with my rip fence, I used to check the distance between the fence and my saw blade with a tape measure.

But trying to hold the end of the tape against the rip fence and adjust it at the same time took more coordination than I could muster. So instead I made a simple setup gauge for my rip fence.

My setup gauge consists of nothing more than a block of hardwood and a 12"-long steel rule, see drawing at left.

I simply cut a shallow dado across the bottom edge of the block to hold the rule. Then glued the rule into the dado with epoxy so that it was flush with the edge (back) of the block.

To use the gauge, just clamp it to the rip fence, see photo. This way, the gauge moves along with the fence as I adjust it, leaving me with both hands free to set the fence.

Miter Gauge Extension


Using a miter gauge to cut multiple pieces to identical length on a table saw is easy — if the pieces are fairly short. But if the pieces are long, it can be difficult cutting them to identical lengths. Unless I use an extremely long fence, there’s no place to clamp a stop block. And a long fence would just get in the way most of the time.

To solve this problem, I added a removable extension rail to the wood fence attached to my miter gauge. Then I made a stop block to fit on the rail. 

Extension Rail: The extension rail is a piece of aluminum bar stock that attaches to the back of the wood fence. (You’ll find bar stock at most home centers.) To hold the rail in place, I cut two notches in the bottom edge of the aluminum bar to fit over screws installed in the fence. Tightening the screws will secure the rail to the fence.

Stop Block: Next, I added a sliding stop block. It’s a thick, hardwood block with a wide kerf that fits over the rail. After positioning the stop block on the rail, locking it in place is just a matter of tightening a knob that fits into a threaded insert (see detail 'a').

Miter Gauge - Bookmark -


When cutting miters on my table saw, I sometimes need to change my miter gauge to a different setting, but then return to my original angle to finish the project.

To help me get back to my original setting, I use a piece of tape to -bookmark - the location on my scale, see drawing. Just before I make my first cut, I place a small strip of adhesive tape across the gauge scale and indicator and cut it with a razor blade (so I can reposition the gauge for my next cut). 

When I need to return to my first setting, all I do is adjust the miter gauge so the strips of tape are realigned.

Finishing Dowels


Once I designed a project that included quite a few dowels. I really didn't give the dowels too much thought — that is until I had to stain and finish them. I soon found out that finishing dowels with a brush can be extremely time consuming and tedious. Plus, it's easy to miss spots around the sides of the dowel.

After a bit of experimenting, I came up with a quick fix that made the job go a lot quicker. I simply taped a couple of foam brushes together, as shown in the photo. The double-edge completely covers one side of the dowel in one stroke. Another stroke down the other side and I'm on to the next dowel.

Drying Rack for Shelves


Finishing shelves can be awkward and time consuming, especially if you need a finish on both the top and bottom surfaces of a shelf. For most of us, this means letting one side dry completely before we can start on the other side. To make things go a little quicker, I built this drying rack that lets me hang the shelves vertically so the entire shelf can be finished in one shot. It only takes a few minutes to build.

First create the side rails by drilling a series of 1"-dia. holes down the center of a scrap board. I used a piece of 2x4 stock. Space the holes about four inches apart. Then rip the board, cutting through the center of the holes, to create a left and right rail, see below.

Now join the rails with a cross brace across the top, as shown in the drawing at right. Size the length of your cross brace according to the length of the shelves you will be finishing.

Next, partially drive a small nail or screw into each end of the shelf, somewhere near the back. Now simply hang the shelves from the half circles you created in the rails. With the rack leaning against a wall, you can finish and hang several shelves at the same time without taking up a lot of space.

Clean-Up Can


I like using a spray gun for finishing. It produces a smooth, even finish in a fraction of the time it takes using a brush. The only downside is the clean up. It's messy and time consuming, especially when you're spraying a solvent-based finish. Plus, the fumes can be dangerous.

To simplify the clean up, I made a special clean-up can out of an old 3-lb. coffee can and a cabinet handle. Simply cut a hole in the plastic lid for the end of your spray nozzle. Then fill the can with rags or paper towels to absorb the finish and thinner that's sprayed out when cleaning the gun.

Note: Be sure to take the rags out of the can and let them air dry in a well-ventilated area before you dispose of them.

Corner Cabinet Kickstand


When I was making a corner cabinet a few months ago, I discovered that the most difficult part of the project wasn’t cutting the miters or even clamping the cabinet together. It was supporting the cabinet on my workbench while working on the face frame.

The solution I arrived at couldn’t be simpler. I just attached a couple of clamps to each end of the cabinet, see drawing. Each clamps works like a kickstand on a bicycle, holding the cabinet upright and preventing it from tipping over while I attach the face frame.

Attaching Glass Stops


When attaching glass stops in a frame or door, I like to drill a starter hole for the brads or screws. Problem is, with the glass in place there's not enough clearance for me to position my drill bit where it needs to be, just above the plate of glass. So I came up with a way to drill the holes just before I install the glass.

The trick is to temporarily use a narrow strip of glass to position the stop. Now I can maneuver my drill where it needs to be to make the hole. After I've drilled all the holes, I put the final glass in place and tack or screw the stops in place.

Turned Spindle Repair


Recently while turning an intricate spindle, my chisel caught the workpiece and tore out a chunk of wood. Rather than discard the turning, I came up with a simple technique to repair the damage.

First I use a parting tool to turn down the damaged area to a consistent diameter, as shown in Figs.1 and 1a.


Next, I select a block of wood with similar color and grain as the spindle that’s being repaired. The length of the block should match the width of the area that was turned down on the spindle. Then I drill a hole in the center of the block to match the diameter of the area to be repaired.

Next I cut the block in half on a band saw (or split with a chisel) and glue in place around the spindle, as shown in Figs.2 and 2a. Once the glue dries, the spindle can be returned. If you take the time to carefully match the grain of the block with the spindle, the repair will be hardly noticeable.

Roundovers on the Table Saw


Shaping an irregular roundover, like the one shown in the photo, is not as difficult as you might think. Here's an easy three-step process for making smooth, clean roundovers using your table saw.

Step 1 - Tilt the saw blade to approximately 25° and position the workpiece vertically to make the first cut. Start on edges with end grain to avoid tearout.


Step 2 - Flip the workpiece around and place it flat on the table to make your second cut.


Step 3 - Sand or plane away the remaining waste to smooth out the roundover and complete the profile.

Raised Panels on the Table Saw


If you can afford the bits, a router makes quick work of cutting raised panels. But here's a less-expensive alternative for making the same cuts using your table saw. You'll still end up with smooth, clean bevels and square shoulders.

Auxiliary Fence.Cutting bevels on the long edges of a panel is no problem. But when you stand the pieces on end, it's a good idea to have the extra support of a tall auxiliary fence. I made mine out of some scrap plywood I had in the shop.

With the auxiliary fence in place, tilt the saw blade (12°) and raise it to the desired height (Fig. 1). (Mine ended up ¾".) Then using a test piece, you can sneak up on the position of the fence until the shoulder profile is created (Fig. 1, detail). Now that the fence is set, you can begin cutting the bevels.
I like to cut across the short, end grain edges first. This way, if there’s any chipout near the tail end of the bevel, it will be removed when the bevel is cut on the longer face grain edges.

Sanding. Even a sharp saw blade will probably leave some swirl marks, so after the raised panels have been cut, the last step is to sand the bevels. But there's one area that needs some extra attention. Since the blade was tilted, the shoulder will be slightly undercut. To square this up, I made a sanding block that has a bevel cut on one edge (Fig. 2 and detail).

Non-skid Miter Saw Table


There are times when it's difficult to hold a workpiece steady on a miter saw. Crown molding, in particular, wants to slip away from the fence when I stand it up on edge.

I know that using a non-slip pad with my router works great to hold a workpiece steady, so I thought I would try the same trick with my miter saw. I found that an inexpensive rubber kitchen mat (made for lining shelves) made a perfect non-slip surface.

When cutting short pieces, I put a strip on the left side only. For longer pieces, I put some on both sides to keep the workpiece level. Just roll the mat up when it's not needed.

Miter Moldings Safely and Accurately


I recently completed a project that required cutting miters on small pieces of molding using a power miter saw. The irregular shape of the molding caused my workpiece to rock back and forth while I made the cut. To solve the problem, I made a small wood support and attached it to the table with carpet tape.

The support block keeps the molding square to the saw table, eliminating the rocking problem I was having before.

Start by rotating the turntable 45° to the right. I placed the carpet tape to the base only and not the turntable. This allowed me to rotate the table without dislodging the block.

Now turn on the saw and lower the spinning blade until it cuts all the way through the molding and the support block. Repeat the process for the other end of the molding by rotating the turntable to the opposite 45° angle setting.

Cutting Plywood - Final Cuts


After making preliminary rough cuts to your plywood (see Cutting Plywood - Rough Cuts), the next step is to trim each piece to final size. This calls for a series of cuts.

Trim Factory Edges: Although you can usually count on this edge to be straight and true, it often gets dented or nicked. So I usually trim off a bit of the edge.

To do this, adjust the rip fence on the table saw to make an extrawide cut, as you can see in Fig.1. Then, after readjusting the fence, run the "just-cut" edge against it to rip the piece to final width. One thing that’s different here is the blade on the table saw cuts on the downstroke. So make sure the "good" side of the plywood faces up.

Make a Double Pass: It's also a good idea to make a shallow pass first, then follow it up with a full-depth cut, as shown in theFig.1 detail.

Use a Crosscut Sled: There's another situation that often comes up when cutting pieces to final size - crosscutting a wide piece. The problem is that a wide piece extends too far out in front of the table saw at the beginning of a cut. This means that the bar of the miter gauge isn't fully supported in the slot in the saw table.

The solution is to use a large sliding platform that provides extra support for the workpiece (Fig.2).


Use a Router: Sometimes a workpiece is too wide even for the crosscut sled. That’s when a hand-held router and a flush trim bit come in handy. The idea here is to first clamp a straightedge to the workpiece so it aligns with the layout line, as illustrated in Fig.3. When you run the bearing of the flush trim bit against the straightedge, the bit cuts a clean, crisp edge.


Cutting Plywood - Rough Cuts


Cutting a full sheet of plywood (or MDF) down to size on a table saw can be a challenge. The sheets are heavy and awkward to move around. And even after you wrestle it into position, the surface veneer has a frustrating tendency to chip out as you make the cut. Fortunately, there are several things you can do to simplify the job - starting with the initial rough cuts.

Make Rough Cuts with a Circular Saw: First cut your plywood sheets down to approximate size using a circular saw. This makes it much easier to maneuver the pieces later on when go to your table saw to make the final cuts (see Cutting Plywood - Final Cuts). I like to start by laying a large sheet of foam insulation board on the floor to provide a cutting surface. I also like to use a shop-made cutting guide to help me get as square and clean of a cut as possible. This will alleviate problems later on when you make your final cuts.

Cutting Guide: The guide consists of two parts: a base that serves as a platform for the saw and a wood fence that guides the saw. I used pieces from my scrap bin to make the guide.

"Good" Side Down: One thing to be aware of is that the blade on a circular saw cuts on the upstroke. This means the surface of the plywood that the saw rides on is likely to splinter. To reduce chipout on the "good" side of the plywood, you'll want to place it face down on the foam board for the cut. If you don't want either side to splinter, you might consider a blade that's specially designed for cutting plywood, as shown in the photo at right.

Double Pass: Another way to produce a clean cut is to make two passes. A shallow, first pass severs the fibers of the surface veneer, as illustrated in detail a. This means the fibers won't splinter when making the second, full-depth pass.

Cutting Identical Slots


I recently built a large entertainment center that needed several identical slots for cord access. Roughing out the slots with a jigsaw wasn't difficult. But getting them all identical, with clean edges was another story. To solve this problem, I decided to cut the slots with my router and a simple shop-made template.


Making the Template
I made my template from a piece of ¼" hardboard. Be sure the overall size of the template is large enough to support the router base. Center the slot on the width and length of the template, leaving the centerlines visible. (Later, they'll serve as reference lines so you can align the template on the workpiece.) I cut the slot in my template by drilling two end holes and roughing out the waste with a jig saw. Then I sanded the edges to provide a smooth edge for my router bit bearing to ride on.


Using the Template
First lay out centerlines on your workpiece where you want the slots located. Extend these lines far enough out that they won't be covered by the template. Then rough out the slot in the workpiece with a jig saw.


Now it's time to use the template. Align the centerlines of the template with the center lines on the workpiece and clamp it in place (see drawing). Then, using a pattern bit in your router, start routing in a clockwise direction around the template opening. Then simply move the template to the location of your next slot and repeat. This will make all slots in your workpiece smooth, clean, and identical.

Custom Fit Dado


Here's a quick way to cut a dado on a table saw. It takes a combination saw blade and two spacers, which establish the two sides of the dado. The material between the sides is wasted out.


Spacer Thickness: The key to making this work is the thickness of the spacers. The first spacer matches the thickness of the workpiece that fits into the dado. (A scrap piece from the project works just fine.) And the second spacer equals the thickness of the blade. (I use a piece of 1/8" hardboard with a single strip of masking tape.)


First Side: Start by clamping one spacer (the scrap from the project) to the rip fence. Then position the fence so the saw blade aligns with the near side of the dado (see detail 'a').

After locking the fence in place, butt the workpiece against the spacer and use the miter gauge to push it through the blade. Note: You can use this same technique for cutting grooves. 

Keep in mind that the spacers need to be the same length as the fence.


Second Side: Keeping the rip fence in the same position, replace the first spacer with one that matches the thickness of the blade, as shown above. With this spacer clamped in place, it's just a matter of making a second pass (see detail 'b').


Remove Waste: Simply "nibble" away the waste by making as many passes as needed (see detail 'b').


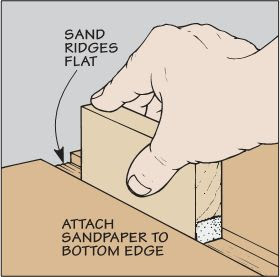
Ridges: If the end of the dado is going to be exposed, you may want to remove the ridges left by the combination blade. For a handy way to do this, take a look at the drawing at left.


Applying Veneer


A piece of veneer with swirling grain can turn a project into something special. But getting the piece centered on the panel can be difficult. Here's a trick that makes the job easier.

First, cut a cardboard mask the same size as the panel you want to cover, and then find the bestlooking area from a sheet of veneer. Trim the veneer to rough size and apply a coat of contact cement.


Before attaching the veneer to the panel, place a piece of waxed paper between the two pieces, see Fig. 1. This allows you to move the veneer around and position it before it's permanently attached.


Once you have the veneer positioned where you want it, slowly pull the wax paper out while applying pressure from a roller.


Finally, trim the edges of the veneer by turning the panel upside down and running a razor knife along the edges, see in Fig. 2.

Indexing Jig for Making Featherboards


Featherboards are a great way to hold a workpiece firmly against a fence or table surface. But there's more to making a featherboard than just sawing kerfs in the end of a board. To get the fingers to flex properly, the spacing between the kerfs must be nearly perfect. To make the job easier, I built an indexing jig from just a few pieces of scrap wood in my shop.

The jig is nothing more than a long piece of plywood (backing board) with two saw kerfs spaced 1/8" apart. In one kerf I glued a hardwood "pin" that serves as a index. Leave the other kerf open.


To use the jig, start by setting your blade to a 30° angle and cut one end of your featherboard. Then position the jig on the table, lining up the open kerf with your saw blade. Next secure the jig to your miter gauge with clamps or screws.

Now position your featherboard against the jig, making sure it's pushed up snug against the index pin, see detail "a." Secure the featherboard to your jig with clamps and cut your first kerf.

Next unclamp the featherboard, and again, push it up snug against the index pin. Reclamp and make another pass to cut your second kerf. Repeat this process to complete all the fingers on the featherboard.