Showing posts with label Cutting Techniques. Show all posts

Turned Spindle Repair


Recently while turning an intricate spindle, my chisel caught the workpiece and tore out a chunk of wood. Rather than discard the turning, I came up with a simple technique to repair the damage.

First I use a parting tool to turn down the damaged area to a consistent diameter, as shown in Figs.1 and 1a.


Next, I select a block of wood with similar color and grain as the spindle that’s being repaired. The length of the block should match the width of the area that was turned down on the spindle. Then I drill a hole in the center of the block to match the diameter of the area to be repaired.

Next I cut the block in half on a band saw (or split with a chisel) and glue in place around the spindle, as shown in Figs.2 and 2a. Once the glue dries, the spindle can be returned. If you take the time to carefully match the grain of the block with the spindle, the repair will be hardly noticeable.

Roundovers on the Table Saw


Shaping an irregular roundover, like the one shown in the photo, is not as difficult as you might think. Here's an easy three-step process for making smooth, clean roundovers using your table saw.

Step 1 - Tilt the saw blade to approximately 25° and position the workpiece vertically to make the first cut. Start on edges with end grain to avoid tearout.


Step 2 - Flip the workpiece around and place it flat on the table to make your second cut.


Step 3 - Sand or plane away the remaining waste to smooth out the roundover and complete the profile.

Raised Panels on the Table Saw


If you can afford the bits, a router makes quick work of cutting raised panels. But here's a less-expensive alternative for making the same cuts using your table saw. You'll still end up with smooth, clean bevels and square shoulders.

Auxiliary Fence.Cutting bevels on the long edges of a panel is no problem. But when you stand the pieces on end, it's a good idea to have the extra support of a tall auxiliary fence. I made mine out of some scrap plywood I had in the shop.

With the auxiliary fence in place, tilt the saw blade (12°) and raise it to the desired height (Fig. 1). (Mine ended up ¾".) Then using a test piece, you can sneak up on the position of the fence until the shoulder profile is created (Fig. 1, detail). Now that the fence is set, you can begin cutting the bevels.
I like to cut across the short, end grain edges first. This way, if there’s any chipout near the tail end of the bevel, it will be removed when the bevel is cut on the longer face grain edges.

Sanding. Even a sharp saw blade will probably leave some swirl marks, so after the raised panels have been cut, the last step is to sand the bevels. But there's one area that needs some extra attention. Since the blade was tilted, the shoulder will be slightly undercut. To square this up, I made a sanding block that has a bevel cut on one edge (Fig. 2 and detail).

Non-skid Miter Saw Table


There are times when it's difficult to hold a workpiece steady on a miter saw. Crown molding, in particular, wants to slip away from the fence when I stand it up on edge.

I know that using a non-slip pad with my router works great to hold a workpiece steady, so I thought I would try the same trick with my miter saw. I found that an inexpensive rubber kitchen mat (made for lining shelves) made a perfect non-slip surface.

When cutting short pieces, I put a strip on the left side only. For longer pieces, I put some on both sides to keep the workpiece level. Just roll the mat up when it's not needed.

Miter Moldings Safely and Accurately


I recently completed a project that required cutting miters on small pieces of molding using a power miter saw. The irregular shape of the molding caused my workpiece to rock back and forth while I made the cut. To solve the problem, I made a small wood support and attached it to the table with carpet tape.

The support block keeps the molding square to the saw table, eliminating the rocking problem I was having before.

Start by rotating the turntable 45° to the right. I placed the carpet tape to the base only and not the turntable. This allowed me to rotate the table without dislodging the block.

Now turn on the saw and lower the spinning blade until it cuts all the way through the molding and the support block. Repeat the process for the other end of the molding by rotating the turntable to the opposite 45° angle setting.

Cutting Plywood - Final Cuts


After making preliminary rough cuts to your plywood (see Cutting Plywood - Rough Cuts), the next step is to trim each piece to final size. This calls for a series of cuts.

Trim Factory Edges: Although you can usually count on this edge to be straight and true, it often gets dented or nicked. So I usually trim off a bit of the edge.

To do this, adjust the rip fence on the table saw to make an extrawide cut, as you can see in Fig.1. Then, after readjusting the fence, run the "just-cut" edge against it to rip the piece to final width. One thing that’s different here is the blade on the table saw cuts on the downstroke. So make sure the "good" side of the plywood faces up.

Make a Double Pass: It's also a good idea to make a shallow pass first, then follow it up with a full-depth cut, as shown in theFig.1 detail.

Use a Crosscut Sled: There's another situation that often comes up when cutting pieces to final size - crosscutting a wide piece. The problem is that a wide piece extends too far out in front of the table saw at the beginning of a cut. This means that the bar of the miter gauge isn't fully supported in the slot in the saw table.

The solution is to use a large sliding platform that provides extra support for the workpiece (Fig.2).


Use a Router: Sometimes a workpiece is too wide even for the crosscut sled. That’s when a hand-held router and a flush trim bit come in handy. The idea here is to first clamp a straightedge to the workpiece so it aligns with the layout line, as illustrated in Fig.3. When you run the bearing of the flush trim bit against the straightedge, the bit cuts a clean, crisp edge.


Cutting Plywood - Rough Cuts


Cutting a full sheet of plywood (or MDF) down to size on a table saw can be a challenge. The sheets are heavy and awkward to move around. And even after you wrestle it into position, the surface veneer has a frustrating tendency to chip out as you make the cut. Fortunately, there are several things you can do to simplify the job - starting with the initial rough cuts.

Make Rough Cuts with a Circular Saw: First cut your plywood sheets down to approximate size using a circular saw. This makes it much easier to maneuver the pieces later on when go to your table saw to make the final cuts (see Cutting Plywood - Final Cuts). I like to start by laying a large sheet of foam insulation board on the floor to provide a cutting surface. I also like to use a shop-made cutting guide to help me get as square and clean of a cut as possible. This will alleviate problems later on when you make your final cuts.

Cutting Guide: The guide consists of two parts: a base that serves as a platform for the saw and a wood fence that guides the saw. I used pieces from my scrap bin to make the guide.

"Good" Side Down: One thing to be aware of is that the blade on a circular saw cuts on the upstroke. This means the surface of the plywood that the saw rides on is likely to splinter. To reduce chipout on the "good" side of the plywood, you'll want to place it face down on the foam board for the cut. If you don't want either side to splinter, you might consider a blade that's specially designed for cutting plywood, as shown in the photo at right.

Double Pass: Another way to produce a clean cut is to make two passes. A shallow, first pass severs the fibers of the surface veneer, as illustrated in detail a. This means the fibers won't splinter when making the second, full-depth pass.

Cutting Identical Slots


I recently built a large entertainment center that needed several identical slots for cord access. Roughing out the slots with a jigsaw wasn't difficult. But getting them all identical, with clean edges was another story. To solve this problem, I decided to cut the slots with my router and a simple shop-made template.


Making the Template
I made my template from a piece of ¼" hardboard. Be sure the overall size of the template is large enough to support the router base. Center the slot on the width and length of the template, leaving the centerlines visible. (Later, they'll serve as reference lines so you can align the template on the workpiece.) I cut the slot in my template by drilling two end holes and roughing out the waste with a jig saw. Then I sanded the edges to provide a smooth edge for my router bit bearing to ride on.


Using the Template
First lay out centerlines on your workpiece where you want the slots located. Extend these lines far enough out that they won't be covered by the template. Then rough out the slot in the workpiece with a jig saw.


Now it's time to use the template. Align the centerlines of the template with the center lines on the workpiece and clamp it in place (see drawing). Then, using a pattern bit in your router, start routing in a clockwise direction around the template opening. Then simply move the template to the location of your next slot and repeat. This will make all slots in your workpiece smooth, clean, and identical.

Custom Fit Dado


Here's a quick way to cut a dado on a table saw. It takes a combination saw blade and two spacers, which establish the two sides of the dado. The material between the sides is wasted out.


Spacer Thickness: The key to making this work is the thickness of the spacers. The first spacer matches the thickness of the workpiece that fits into the dado. (A scrap piece from the project works just fine.) And the second spacer equals the thickness of the blade. (I use a piece of 1/8" hardboard with a single strip of masking tape.)


First Side: Start by clamping one spacer (the scrap from the project) to the rip fence. Then position the fence so the saw blade aligns with the near side of the dado (see detail 'a').

After locking the fence in place, butt the workpiece against the spacer and use the miter gauge to push it through the blade. Note: You can use this same technique for cutting grooves. 

Keep in mind that the spacers need to be the same length as the fence.


Second Side: Keeping the rip fence in the same position, replace the first spacer with one that matches the thickness of the blade, as shown above. With this spacer clamped in place, it's just a matter of making a second pass (see detail 'b').


Remove Waste: Simply "nibble" away the waste by making as many passes as needed (see detail 'b').


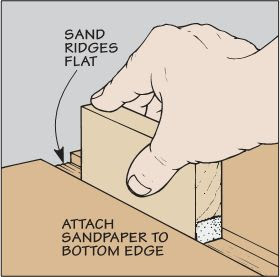
Ridges: If the end of the dado is going to be exposed, you may want to remove the ridges left by the combination blade. For a handy way to do this, take a look at the drawing at left.